
My weekly fail2ban report used to look the same every single week: around 200 hits, like clockwork. The same IPs from the same corners of the internet, the same password attempts against port 22, the same scripts crawling through address space. Then, one Sunday afternoon, I switched SSH to key-only auth, set up TOTP for root, and tightened sshd_config. A week later, the mail arrived. 0 hits.
Not 50, not 20. Zero. fail2ban had nothing left to count, because nothing was getting through anymore. The scanners still send their attempts, but sshd doesn't answer them. This article is the checklist I worked through that day, plus the two things I learned along the way: TOTP for root and fingerprint verification with the Hash Generator.
Why Password Login Is the Problem
A password is something you know. An SSH key is something you have. Sounds obvious, but it decides between a server that just hums along in the logs and one that gets brute-forced every night.
Internet scanners are not clever. They run dictionaries, default passwords, the hundred most common combinations. A good password stops them cold. A bad one doesn't. And there's the rub: you can't guarantee that every user picks a good password. I couldn't guarantee it for myself. After a year of admin work I knew there was a password somewhere that should have been changed long ago.
With key-only auth, that whole attack surface disappears. There simply is no password path left for a scanner to try. That's why fail2ban went to zero after the switch: not because attackers stopped, but because sshd had nothing left to answer.
The Sunday I Switched
I didn't flip the switch in one go. That's the mistake people make, and it locks them out. My plan had three stages.
Stage one: generate keys for every account, copy them to the server, and log in with a key once to prove it works. Stage two: write the lines from the checklist below into sshd_config and reload the service. Stage three: keep the old session open, open a second one, and only then close the first. If anything breaks, you still have a lifeline.
The whole thing took about an hour. Reading the report a week later took ten seconds: 0 hits.
Generating Keys: ed25519 Over RSA
Before the checklist does its job, you need good keys. I generate mine with ssh-keygen -t ed25519. Ed25519 keys are short, fast, and considered the safe standard today. RSA at 4096 bits works too, but the files are clunky, and the overhead is unnecessary.
ssh-keygen -t ed25519 -a 100
ssh-copy-id admin@server.example.com
The -a 100 raises the passphrase derivation iterations. It costs half a second on login and makes cracking the passphrase orders of magnitude more expensive. The passphrase itself comes from the Password Generator.
One key per device, not one for everything. Laptop, desktop, server console: three keys, three files. When a device goes missing, I remove only its key from authorized_keys and everything else keeps working.
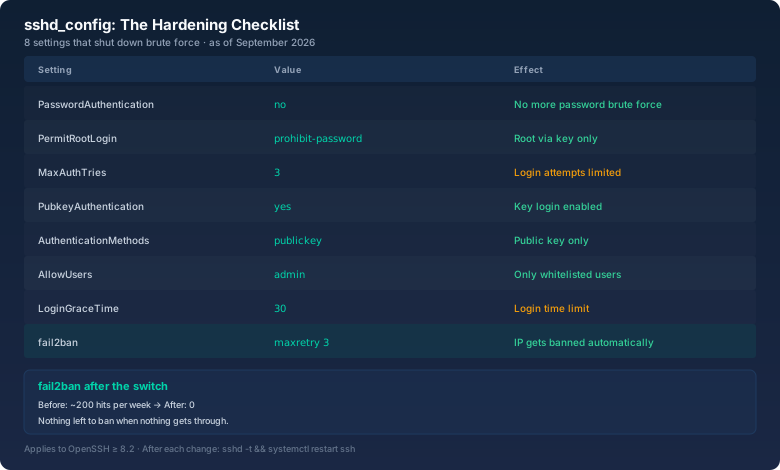
The sshd_config Checklist
The table above is the order in which I worked through the file. Every line has a reason, and every line costs you a bit of convenience as an admin. That's the trade.
# /etc/ssh/sshd_config: the lines that matter
PasswordAuthentication no
PermitRootLogin prohibit-password
MaxAuthTries 3
PubkeyAuthentication yes
AuthenticationMethods publickey
AllowUsers admin
LoginGraceTime 30
The line that kills most hits is PasswordAuthentication no. After that, sshd refuses passwords entirely, no matter how often they're offered. PermitRootLogin prohibit-password still lets root in with a key, but never with a password. That's the compromise for a server without a console: I get in, but only with the right key.
MaxAuthTries 3 limits attempts per connection, LoginGraceTime 30 caps how long a half-open connection may live. Both throttle exactly the behavior fail2ban used to count every day. AuthenticationMethods publickey forces the key method and nothing else. And AllowUsers admin shrinks the set of accounts that can even be addressed.
After every change: sshd -t to test, then systemctl restart ssh. And hold on to your console before you close the session. I once lost a connection because of a typo in the file and a firewall that blocked the new session. Since then the rule is: open a second session first, then restart.
TOTP for Root: The Second Factor
A key alone is strong, but a stolen key is like a stolen house key. That's why root gets a second factor. Mine is TOTP: a six-digit code that renews every 30 seconds, generated by an app on my phone.
apt install libpam-google-authenticator
google-authenticator        # scan QR code, back up the secret
# add to /etc/pam.d/sshd:
auth required pam_google_authenticator.so
Then, in sshd_config: AuthenticationMethods publickey,keyboard-interactive. Key first, then the code. Anyone missing either one stays out.
I scan the QR code with the authenticator app, but I also keep a backup of the secret. Lose your phone without a backup and you're standing in front of a locked door. It happened to me once, on a server 600 kilometers away. I didn't even have the datacenter access card that day. Since then, the recovery codes live on paper in the safe, next to the SSH key backups.
For the key passphrases themselves I use the Password Generator. Four random words from the tool beat any combination I'd invent myself. Self-made word chains are more predictable than you think.
Verifying Host Key Fingerprints
The first connection to a new server is the moment man-in-the-middle attacks happen. Your client shows you the host key fingerprint. If you don't check it, you'll accept anyone who claims to be your server.
ssh-keyscan -t ed25519 server.example.com \
  | ssh-keygen -lf -
The result is a hash like SHA256:9tK...=. I compare that value against what the server owner sent me over a second channel. And when I want to recompute a hash myself, I use the Hash Generator and let it run SHA-256 over the .pub file. The fingerprint ssh-keygen shows is essentially exactly that: a SHA-256 hash over the public key.
Quick note: the fingerprint in /etc/ssh/ssh_host_ed25519_key.pub is the host fingerprint. Your own key fingerprint lives in ~/.ssh/id_ed25519.pub. The Hash Generator can recompute both, and both should match what you expect.
Once checked in, the fingerprint lands in known_hosts. From then on, your client remembers which key belongs to which server. If it ever differs, the connection fails, and that's a good thing. That exact check saved me once when a server came back from a migration day with a fresh host key. Without it, I would have accepted the new key blindly.
What fail2ban Still Reports
Zero hits doesn't mean nothing happens. The scanners still come around, they just don't make noise anymore. What remains is the quiet stuff: port scans that inventory your open ports, occasional attempts on other services, log lines you can safely ignore.
My report today looks like this: instead of 200 password attempts per week, there are two or three entries per month, and they're almost always harmless. If an IP does knock on port 22 suspiciously often, I ban it by hand in a minute. fail2ban isn't sleeping. It just has less to do.
# /etc/fail2ban/jail.local
[sshd]
enabled = true
maxretry = 3
bantime = 1h
What I took away from the whole exercise: the best security measures are the ones that make sure nothing arrives in the first place. fail2ban is a good net, but it's better to keep the fish out of the pond entirely.
PasswordAuthentication no · PermitRootLogin prohibit-password · AuthenticationMethods publickey · MaxAuthTries 3 · TOTP for root · then sshd -t and restart.