
September 2021, a customer's data center. Two drives out of twelve in a RAID 6 array throw SMART warnings on the same day. Reallocated Sector Count on drive 4 jumps from 0 to 48. Drive 9 reports 3 Pending Sectors. The customer calls, voice somewhere between panic and "I told you we should have swapped these last year."
Two hours later the array was healthy again, because someone knew which values actually matter and which ones are just noise. That's what this article is about.
What SMART Actually Does
SMART (Self-Monitoring, Analysis and Reporting Technology) has been built into every hard drive and SSD made in the last 20 years. The drive keeps a log of its own health: how many times the read head had to recalibrate? How many sectors went bad and got replaced from the spare pool? How hot did the drive get in the last 24 hours?
The drive writes these values into internal non-volatile memory. You can read them with smartctl, the Swiss Army knife from the smartmontools package. Every value carries an ID, a raw value, and for many also a threshold. When the normalized value drops below the threshold, the drive is marked as "FAILING_NOW".
That sounds like a solved problem. It's not, for two reasons: first, manufacturer thresholds are often useless. A drive can quietly die for weeks without SMART ever flipping to FAILING_NOW. Second, most admins can't tell the difference between attributes that signal real physical degradation and ones that just mean the cable is loose.
That distinction is the whole game. Get it wrong and you're either swapping perfectly healthy drives or letting dying ones linger in the array until they take data with them.
Talking to the Drive: smartctl in 30 Seconds
Before we dig into the values, the basics. Here's how you pull all SMART data from a drive:
smartctl -a /dev/sdaThe -a flag stands for "all" and gives you: device identity, SMART feature status, the attribute table, error logs, and self-test results. For quick monitoring, the attribute table is all you need:
smartctl -A /dev/sdaThe output is a classic table with columns: ID, Attribute Name, Flag, Value, Worst, Threshold, Type, Updated, When_Failed, Raw_Value. The three columns you care about are Value (the current normalized value, usually starts at 100 or 200 and drops when things go wrong), Threshold (the manufacturer's tripwire), and Raw_Value (the actual count in plain numbers).
A quick check to see if SMART is even turned on:
smartctl -i /dev/sda | grep "SMART support"If it says "SMART support is: Enabled," you're good to go. If you see "Available - device has SMART capability" without "Enabled," you need to turn it on: smartctl -s on /dev/sda.
For SSDs, use -x instead of -a. It also shows NVMe-specific logs like Media Errors and Percentage Used. But that's a whole separate article.
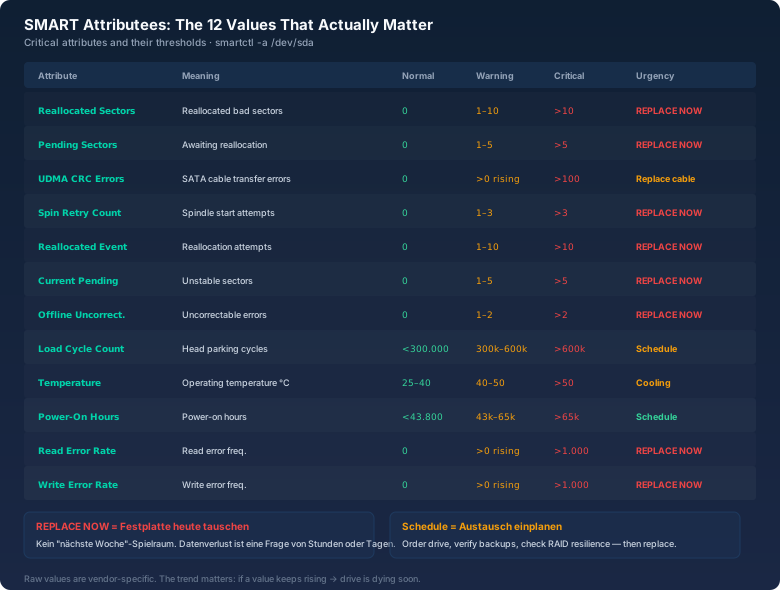
The Values That Actually Matter
Not all SMART attributes are created equal. Some are early warning signs of mechanical wear; others are red herrings that send you down the wrong path. I sort them into three categories.
Category 1: Smoke on the Horizon: These Values Are Real Warning Signs
Reallocated Sectors Count (ID 5). This is the classic. A sector on the platter surface is physically damaged or can't be read reliably anymore. The drive firmware marks it as bad and pulls a sector from the spare pool. Raw_Value shows the absolute number of remapped sectors.
A handful (say, 5 to 20 on a drive with 100,000 power-on hours) is normal. Drives age, surface defects happen. What should alarm you: a sudden spike over a short period. If the value jumps from 8 to 80 and then to 200 the following week, the platter surface is coming apart. Swap the drive, and soon.
I once had a 4 TB Seagate in a backup server that sat at 12 Reallocated Sectors for two years. No further increase, no performance hit. I kept an eye on it and swapped it preventively after 18 months, but there was never a reason to panic.
Current Pending Sector Count (ID 197). These are sectors the drive flagged as problematic during reads but hasn't given up on yet. They're in limbo: either the sector gets overwritten on the next write and starts working again, or it gets permanently marked as bad and a Reallocated Sector replaces it.
Pending Sectors are more dangerous than already-remapped ones because they signal instability. A running system with Pending Sectors can produce read errors at any moment. In a RAID array that means the controller has to reconstruct the sector from parity, which complicates rebuilds when things actually go south.
Rule of thumb: Pending Sectors that haven't vanished or been remapped after a week mean trouble. If I see more than 5 Pending Sectors at once, I pull that drive from production immediately.
Offline Uncorrectable Sector Count (ID 198). Sectors that could not be read at all during an offline scan. This is the hard version of Pending. Every one of these sectors is data loss at the drive level. In a RAID array, parity or mirroring can catch it, but this is not a state you want to ignore.
Spin Retry Count (ID 10). The motor tries to spin up the platters, fails, and tries again. Every retry is a mechanical problem: the motor can't reach rated speed, the bearings are stiff, or the power supply is unstable. A single Spin Retry on a healthy drive is reason enough for a closer look. At 10 retries I'd classify the drive as failure-prone.
I remember a server where the Spin Retry Count went from 0 to 47 in three days. The drive was still running, SMART status was still "PASSED." Two days later it wasn't visible in the BIOS anymore. The motor had given up for good.
Category 2: Important Context: The Secondary Indicators
Reported Uncorrectable Errors (ID 187). Errors the drive electronics couldn't correct and passed on to the operating system. Unlike ID 198, this counter tallies all uncorrectable errors, not just the ones caught during offline scans. A single entry could be a cosmic ray strike. Multiple entries are a pattern.
Temperature (ID 194 or 231). Heat kills drives. Google's much-cited 2007 study showed that drives below 25 °C and above 45 °C fail more often. The sweet spot is 30 to 40 °C. What many people don't know: temperature swings are worse than consistently high temperatures. A drive that oscillates between 28 and 48 °C over the course of a day ages faster than one sitting at a steady 44 °C.
The Raw_Value for temperature attributes is often encoded. On some drives the temperature sits in the upper 16 bits, on others in the lower. smartctl usually parses this and shows the temperature in °C in the right-hand column.
Load Cycle Count (ID 193). Counts how many times the read head has been parked. On 2.5-inch laptop drives this value is often absurdly high because aggressive power management parks the head every few seconds. Western Digital Green drives were notorious for this: Load Cycle Counts of 300,000 after a year were not unusual. The problem isn't the number itself but that frequent parking means mechanical wear.
For server drives running 24/7, the Load Cycle Count should stay low. A rise without an obvious reason (like someone enabling hdparm -B on a server) needs investigation.
Category 3: Red Herrings: Values That Rarely Blame the Drive
UDMA CRC Error Count (ID 199). The all-time champion of false alarms. This value counts transmission errors between the drive and the host controller: errors on the SATA or SAS cable. Every time a data packet arrives with a bad checksum, the counter goes up.
When ID 199 is climbing, replace the cable, not the drive. In 25 years I have never seen a single drive where UDMA CRC Errors were actually caused by the drive itself. It's almost always a cheap Chinese SATA cable, a half-seated connector, or an overloaded SAS expander.
Raw Read Error Rate (ID 1) and Seek Error Rate (ID 7). These values are vendor-encoded and practically useless without the firmware decoding table. Seagate, WD, and Toshiba all use different encodings. The normalized Value can give you a rough trend (if it drops below 60, something's wrong), but the Raw_Value is meaningless. Don't waste time trying to interpret these numbers.
Hardware ECC Recovered (ID 195). Counts errors corrected by the drive's internal ECC. This is normal operation. Every modern hard drive has an error rate that would be catastrophic without ECC correction. A high value is not inherently a problem. Only a sudden spike combined with other attributes is worth paying attention to.
How Backblaze Predicts Failures With SMART
Backblaze operates over 250,000 hard drives and has been publishing quarterly failure statistics since 2013. Their data is the best publicly available source for understanding which SMART values genuinely correlate with failures.
The five attributes with the strongest correlation to drive failure, according to Backblaze: SMART 5 (Reallocated Sectors), SMART 187 (Reported Uncorrectable), SMART 188 (Command Timeout), SMART 197 (Current Pending Sector), and SMART 198 (Offline Uncorrectable). When a drive has one or more of these values above zero, its failure probability over the next 60 days is significantly elevated.
Backblaze also found that drives with SMART 5 > 0 have an 8× higher failure rate than drives with SMART 5 = 0. For SMART 197 > 0, the rate is 14× higher. These aren't theoretical numbers. This is 250,000 drives over ten years.
For admins with smaller installations, the message is straightforward: trust the five critical values and ignore the rest as long as the overall health is stable.
Monitoring Strategy: Making SMART Part of Your Routine
Reading SMART data once is pointless. The value is in the trend. A drive that jumps from 0 to 15 Reallocated Sectors in a week is a completely different beast from one that's been sitting at 15 for two years.
I use three layers:
Layer 1: smartd. The daemon from the smartmontools package monitors all drives in the background and writes changes to syslog or sends emails. Configuration in /etc/smartd.conf:
/dev/sda -a -o on -S on -s (S/../.././02|L/../../7/03) -m admin@example.com
/dev/sdb -a -o on -S on -s (S/../.././02|L/../../7/03) -m admin@example.com
This enables automatic offline tests, SMART attribute monitoring, a short self-test daily at 2 AM, and a long test on Sundays at 3 AM. Changes trigger an email.
Layer 2: Quick daily check. A one-liner for your morning routine:
for d in /dev/sd?; do echo "=== $d ==="; smartctl -A "$d" | grep -E 'Reallocated|Pending|Offline_Uncorrectable|Spin_Retry|UDMA_CRC'; doneThis filters the five attributes you actually care about. Takes three seconds and gives you a gut feel for your drives' health.
Layer 3: Prometheus + node_exporter with textfile collector. If you run Prometheus, you can write SMART data via cronjob into a textfile and have the node_exporter pick it up. That gives you Grafana dashboards with historical trends: Reallocated Sectors over time, temperature curves, the works. Here's a cronjob:
#!/bin/bash
# /etc/cron.daily/smart-prom
OUT=/var/lib/node_exporter/smart.prom
echo "# HELP smart_reallocated_sectors Reallocated sector count" > "$OUT"
echo "# TYPE smart_reallocated_sectors gauge" >> "$OUT"
for d in /dev/sd?; do
  DISK=$(basename "$d")
  VAL=$(smartctl -A "$d" | grep "Reallocated_Sector_Ct" | awk '{print $NF}')
  echo "smart_reallocated_sectors{disk=\"$DISK\"} $VAL" >> "$OUT"
doneWhere the RAID Calculator Comes In: Planning for After the Failure
When SMART tells you a drive is dying, you need to do two things: swap the drive and make sure the array survives the rebuild. That's when the bitcalc RAID Calculator becomes relevant.
Two real-world scenarios:
Scenario 1: RAID 5 with 4 × 18 TB. Drive 2 reports 24 Reallocated Sectors with an upward trend. You have a hot spare and start the rebuild. The question now: does the array survive the rebuild? RAID 5 has no redundancy during a rebuild. If a second drive has a single unreadable sector during those 40 hours, you lose data. With 18 TB drives at a URE rate of 1 in 10^14 bits, that probability is not trivial.
The RAID Calculator shows you exactly this perspective: usable capacity by RAID level, but also the redundancy situation during and after a rebuild. In this scenario you'd see that RAID 5 at this drive size is a risk and that upgrading to RAID 6 (4+2) dramatically improves rebuild safety.
Scenario 2: You're planning a new NAS. SMART data from your old drives tells you which models hold up longest under your conditions. Use the RAID Calculator to run through different configurations: what does RAID 10 with 8 drives cost vs. RAID 6 with 6 drives? How much usable capacity do you get? How many IOPS can you expect? These are decisions you make before buying, not while the array is degraded and you're under time pressure.
I've made it a habit to hit the RAID Calculator before every new storage purchase, then order the drives. It saves money and prevents the classic "should've gone with the other config" moment three years later.
SMART Self-Tests: Short, Long, and What the Results Mean
Beyond the attribute values, SMART offers two built-in test modes every admin should run regularly. The short test (smartctl -t short /dev/sda) takes about two minutes and checks the electronics, the motor, and a small part of the surface. The long test (smartctl -t long /dev/sda) reads the entire platter surface sector by sector and can take several hours depending on drive size. At 18 TB, 24 hours is realistic.
Check the status of a running test with smartctl -l selftest /dev/sda. The output shows all past test results with timestamps. "Completed without error" is what you want to see. "Completed: read failure" at LBA 1234567890 means exactly that sector is dead. Note the LBA address and watch whether the drive remaps it on the next write or whether the error persists.
A concrete case: on a customer server I had a long self-test that aborted at 90% with a read error. Three days later, same test, error at 90%, different LBA. A week later, errors at 30%, 60%, and 90%. The platter surface was disintegrating. We replaced the drive that same day and the rebuild ran clean. If we'd only looked at the SMART attributes (which were all green at that point), the drive would likely have stayed in the array for another two weeks before failing completely.
Bottom Line: Five Things You Should Do Differently Tomorrow
SMART is an early warning system, not an oracle. The data is there, it's free, and most admins ignore it until it's too late. Three minutes a week is all it takes to know the state of your drives.
My five takeaways from 25 years of drive maintenance:
1. Reallocated and Pending Sectors are the only SMART values that should keep you up at night. Everything else is context or noise.
2. UDMA CRC Errors are almost never the drive. Swap the cable before you pull the drive. It saves you embarrassing RMA returns.
3. Trend is everything. A value that's been stable for two years is irrelevant. A value that escalates within a week is an emergency.
4. SMART doesn't tell you everything. 20 to 30 percent of drives die without warning. SMART is insurance, not a guarantee.
5. Use the RAID Calculator before you panic. When a drive throws SMART warnings, you want to know how your array handles the rebuild and whether your redundancy still makes sense for your current drive sizes.
The quietest nights I've had were the ones where I knew in the morning which drive was next on the chopping block, instead of getting yanked out of bed at 3 AM by a degraded array.